
Have you ever seen those black marks which can appear on your photo icing printouts, particularly on darker prints? We run through 4 steps which will stop this issue, so you never have to see this again! Woohoo!

So what are those dots on my icing printouts?
The dotted lines are as a result of residue edible ink from the pin feeds, which are used to help guide the sheets through the printer. You can see they are sharp ‘cogs’ of sorts, which lightly touch the frosting sheet as it prints. The marks are formed when the drying printer ink transfers onto the pin feeds, and back onto the white icing sheet.

Why is this happening now?
There are a few variables which causes these black marks to appear on some occasions:
Printer Settings – When printing on some print settings, the ink can take longer to dry, since it is injecting more ink onto the sheet.
High humidity – Ink can also take longer to dry when printing onto an icing sheet in humid conditions. When the icing sheet has little moisture, it will absorb the ink much more quickly.
Icing thickness – Many of the major inkjet printers are designed for paper thicknesses of up to 0.3mm thickness. This means the marks can sometimes make more of an impression on the icing sheet as a result, which can be around 0.4mm in thickness.
So how do I stop the roller marks appearing?
There are 4 solutions below, based on the variables highlighted above. Got any other tips yourself? Drop a note in the comments below!
1. Clean the pin feed wheels
First of all, you need to clean the area which is causing the problem. In the video below from Deco UK, they detail a technique to clean the top pin feed wheels, by lightly dampening a piece of cardboard, and running it back and forward until the residue ink is removed.

2.Widen the clearance between the sheet and the rollers
Selecting the ‘Prevent paper abrasion’ setting in the printer settings will widen the clearance between the Print Head and the loaded paper, meaning that the pins won’t roll onto the icing sheet so closely.
To do this, assuming you are using a Canon (a brand we recommend for icing printing due to their removable print heads), click on Printer Properties > Maintenance > Custom Settings > and tick ‘Prevent Printer Abrasion’. Incidentally, changing the ‘ink drying wait time’ won’t help this – this is simply the time the printer waits between each print.
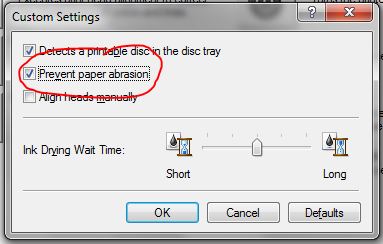
A note about this: if you are subsequently printing on other regular paper, you may want to untick ‘prevent paper abrasion’. Since the head is further from the paper with this option ticked, the print quality may deteriorate marginally. If you notice a difference, revert back by unticking the box.
3. Dry out paper
If it is humid conditions, the icing sheet can take longer to absorb the ink, meaning that the drying ink can roll onto the sheet. In this situation it helps to dry out the sheet – you can use the same techniques as for our article on removing icing from its backing (options 3, 4 or 5) to solve this. So, for instance, pop it in a fan oven for a few minutes so that it can absorb the ink much quicker.
4. Change printing quality settings
If you are printing on some photo print settings, the ink can take longer to dry due to the layer thickness it is printing. Don’t use the photo printing setting– we strongly recommend the ‘plain paper’ which is much better suited to the surface it is printing on. If you are printing on a PDF like from the Topperoo Designer, you can still choose ‘High Quality’, however if it still is leaving marks, reduce to ‘normal quality’.
So there you have it, 4 tips to stop those black marks appearing on your prints.
What questions do you want answered about Edible Ink Printing? Drop us a comment below and we’ll put in a future blog post!

May I ask your suggestion for Epson L210? BTW, I’ll try no3-4 first.
Thanks
Hi Arisara, we haven’t used a Continuous Ink Supply System (CISS) like the one you mention so I can’t really advise on this. If you know others that are using this printer successfully for edible printing then go with that.
As a general rule of thumb, we tend to stick to Canon (due to the removable printer head for each cleaning). If you want a decent A3 printer, go for the iX6800 series (as of 2015). Otherwise try the MG6600 or MG5600. If you want more education around this subject we have a free email series on it here: http://www.topperoo.com/edible-printing-beginner-course
Let me know how you get on with the steps above anyway!
Many thanks:)
Hi. Using Canon ip7250, done everything https://uploads.disquscdn.com/images/fabe2c99625f12364aa15bdf1341f3b47a4a9a6b02aac860d064d7808565cffe.jpg but still getting same result ( I’m using KOPYFORM Decor Paper PLUS (0.45 – 0.55 mm thin). can you advise anything?
Hi Maksims, one more suggestion for you – try placing wooden dowels on each side of the print head to widen the gap further between the rollers and the tractor feeds.
do you have a picture of how you placed the dowels ?
I am using Fuji Xerox CT350851 since one year. This article is well written, and now I’m able to use and maintian the printer in a much better way. Thank you for sharing this useful article with us.